One Way to Design a Rya Rug

Here is Carol Solinger with her rya almost complete (11/1/18)
Everyone tackles rya designing in their own way. In July this year, a long-time customer (and now friend), Carol Solinger, made an appointment to come to my studio to pick out the backing and yarn for her next rya project. She had recently moved to Maryland from Connecticut making it much easier to drop by for supplies.
First, Carol selected a backing. 4 1/2′ x 6 1/2′ or so. It is a fairly large backing which will be used on the floor. She brought along a printed fabric sample explaining to me that it was not the design, but the colors in this fabric she wanted to match with the yarn on hand.  We did a little calculations to figure that this backing would require about 70 skeins since Carol is using three strands of Rauma ryegarn to the needle and likes a fairly long pile of about 2″. But there was no need to get all the yarn at once. So for the most part, she picked out 2 skeins of every color she wanted. We laid them out on the table. They were very pleasing to look at. She had an abstract design in mind which was in black and white. (See photo.) She wasn’t done planning out what she was going to do with the design, but that was not a worry. Carol has plenty of experience in designing her own ryas.

A month or two later, Carol ordered another pile of yarn …
She left knowing full well she would need more yarn as the project unfurled and her design developed.
What I had not expected to see, nor have I ever seen anyone do before, is Carol decided to work upwards on her backing rather than straight across the rows! To all of my rya students, you may recall me saying “Never work upwards, but always across the rows.” But then I would always add, “But if you do move upwards, just do not make knots over a blank area.” Carol, moved straight up making the creative color blended side margin without knotting over a blank area. (You go, girl!) She also drew out the design on the backing (which many people do) but she continued to work the full length (rather than width) as the pattern dictated.
She has sent the following photos I could share her progress with you. I am mesmerized by it and thrilled to realize that after so many decades doing rya, I can still learn from others and grow. I’ll add updates to this blog post as Carol shares more pictures with me.
Thank you, Carol, for documenting this process.

Notice how Carol is working vertically, though the knotting rows go left to right. Also note how she fills little plastic bags with her three-strand threadings so they are ready to grab and knot.

Early September and she appears to be half way done.

I asked Carol to send me a photo for the book showing how she knots with the design drawn on the backing. Notice she is using two strands of Ryegarn and one (thinner) strand of Prydvevgarn on her needle.) Thought you might enjoy this photo, too. Some people can’t imagine drawing on the backing. The pile will totally cover your markings as you knot.

Her friend, Leon, pitching in. Stay tuned for additions to this photo-series… As the Rya Turns . . .

And here it is complete and in place next to the couch of the fabric which originally inspired the color selection. Now you can rest, Carol.
 Remember being a little child and every time you did something you were proud of, you would run around and show everyone saying, “Look what I made!” or “Look what I did all by myself!” I think artists are the same way. We make something and must show people. It validates who we are as unique artists. If an artist creates and doesn’t share, are they really an artist? Is sharing intrinsic to being an artist? I don’t know. But let’s share just the same.

 I am still an ARTIST! I am still a show-off! So take a last look at the wicked cool stuff I did from about 2000 to 2016 in the non-rya world. I made a little game for you to ensure you don’t miss anything. If you search my artwork-of-the-past and answer the following questions, your name will be added to a hat from which the winner will be drawn on September 1, 2018. The winner can select any shirt from the many still remaining in my possession–hand-printed or silkscreened. (You weren’t expecting a free rya rug, were you?) To see what shirts are available,


 First, I want to thank you for all the title suggestions and comments shared on my last blog. There were 20 comments and ALL were very meaningful and helpful. I think I have made the big decision, but will wait until closer to book release time to reveal the winner. That also gives me a little leeway in case I change my mind again.
 METRIC: Throughout my book I have written all measurement in the Imperial system (inches, feet …) followed by the Metric system (cm and M) in parentheses. I know most of my customer base are from the USA and most slip into a catatonic state when I mention lengths in centimeters. I majored in the biological sciences in college and always used the metric system, but even my USA-brain thinks in the Imperial system in daily communication. The main problem is to list both in the book text every time I mention a length makes the sentence look unwieldy and is a little hard to read. So do I use the Imperial system, metric, both, or put a conversion table in the appendix. YOU may have a better idea. I think I know what needs to be done, but I’m looking for reassurance. (Now you know how insecure I really am.)


 The book is conversational and empowering to the reader who wants to make a rya rug–and hopefully design their own rya. There is some history of the Nordic art, but it is not a history book. It has lots of examples and stories about and by individuals who have taken rya rug-making to new heights. Most of all, it walks the reader through all they need to know to design and make their own rya rug…hey! That sounds familiar.
 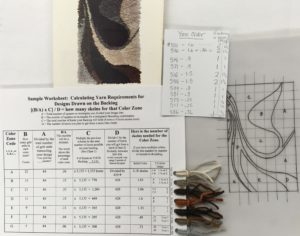 It has some math and charts and worksheets, lots of photos, and resources for supplies and more information. Any questions? This would also be a great time to make requests for things you are looking forward to seeing in the book…It is probably already in there, but it isn’t to late to add more of what you are looking for.
 One month ago I offered to handprint any design on any of my 125+ blank shirts. Many of you took advantage of the offer and placed orders. I cut the order acceptance off on Thanksgiving, and started printing the very next morning and the next whole day. For every design ordered, I printed another 5-8 shirts to plump up my printed shirt bins. So today with achey back and hands I have updated my shirt listings in my etsy shop which I will share with you as links you can click on to see what is available in each size. (11/28/17: I still have a few sizes to photograph and list…but this is a good start.


 October 8, 2017–update: Since last month’s bulk discount announcement, three colors have run out. The photo to the left reflects the current availability.
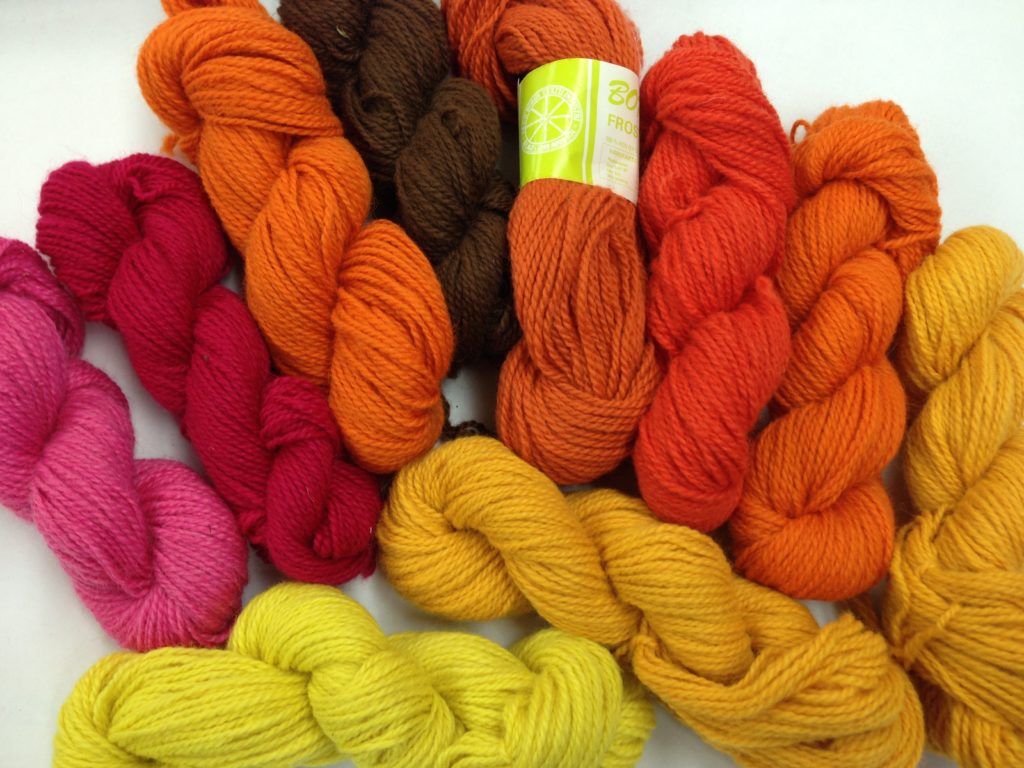


 I decided to share this letter as a blog because there are so many others out there who might be in the same stages of rya learning as you. Plus, this way, you can all communicate with each other and me by adding comments below. Maybe even people who were not in the class might ask questions or offer ideas, too!
 First let me say, I totally loved being your instructor at Stitches United in Hartford, CT last week. I now know that people who handle yarn regularly as knitters or weavers have a more natural tendency to grasp the basic concepts of graphing a rya rug. I can’t wait to see the outcome of your designing work. You were all so diverse in your designs.
 Remember the Gray Fireflower design on which you all made your first knots? I just finished that a couple of evenings ago. I really like it. Take a look.


 And this just in from Julia Horgan, inspired by the drawing of the hydrangea flowers and leaves. Great color blendings.
 And below is Nancy’s–all done. Remember how Nancy loved the traditional Finnish ryijy from one of my catalogs? She redesigned a smaller version as seen here, but she also asked me to order the real kit from Finland which she now has received and will be starting shortly. We know it will be quite different to knot, but the colors will be spectacular and the yarn finer and softer. (Remember the Finnish skein I showed you in class–how it looked like nice yarn for a sweater?) So stay tuned on Nancy’s report on the new project!
